Create a digital menu for your restaurant in 15 minutes just from your smartphone
Creating a digital menu for a restaurant, a hotel, a bar or any other place or business has now become of fundamental importance. The digital menu, in addition to saving you money on paper printing, allows you to update your restaurant’s menu without wasting printed promotional material.
The problem that a Ho.Re.Ca. professional finds is the technological barrier with digital tools and time ⏳
With moblypage.com we have helped hundreds of venues create their own digital menu in very little time and without technical skills. What’s more, all with your smartphone 📲
Digital menus that are simple to consult, efficient, multi-language and can be managed directly from a smartphone. You can create categories, dishes, add photos, descriptions, manage allergens and edit everything in just a few clicks and in real time.
In this article we will guide you step-by-step to create your new digital menu.
What you will need is your smartphone, an image of your logo and some photos of your venue 🤩
Ready to get started? 💪🏻
Create a project
Once you have logged in to the platform (if you don’t have an account you can create one here) you can create a new project or access an existing project.
Think of projects as workbooks that collect documents. The documents within them are one or more web pages, including digital menus. Each workbook can be reached from a URL address like https://nomelocale.mobly.page
You can also register a domain https://www.yourdomain.com and point it to that folder. But we’ll talk about this in another article 😉
Let’s go step by step. If you don’t have any projects:
- Click the green New Project button
- Give your project a name, for example “New Digital Menu” and click “Next”
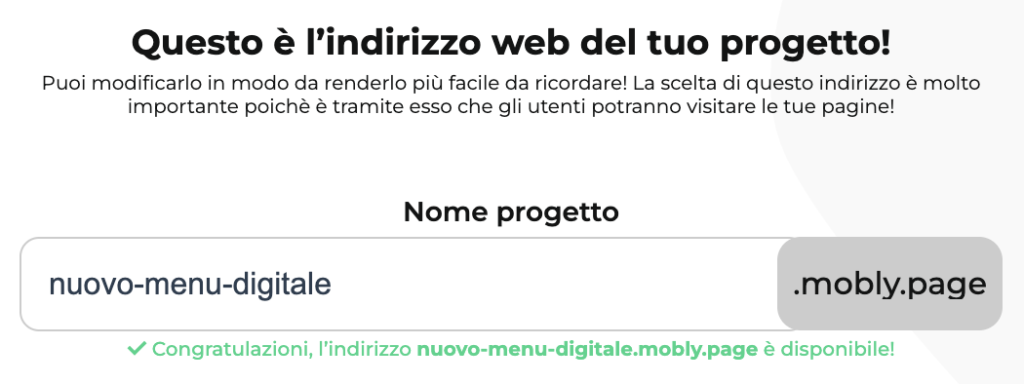
- At this point you can choose the web address of your new menu. The system shows you a field where you can decide which name to use. If you followed point 2 to the letter you will find yourself as in the following photo. You can enter anything inside the field and click “Next”. Just remember that the field does not accept spaces and/or special characters. The text you enter in this field will be the address to reach your menu. We recommend that you enter the name of your restaurant so your menu can be reached at https://nomelocale.mobly.page
- At this point, give your page a name. You can write anything as it only represents the name of your page, for now no one will see it, it only serves you. In this example you can put “Digital Menu” and click “Next” 😉
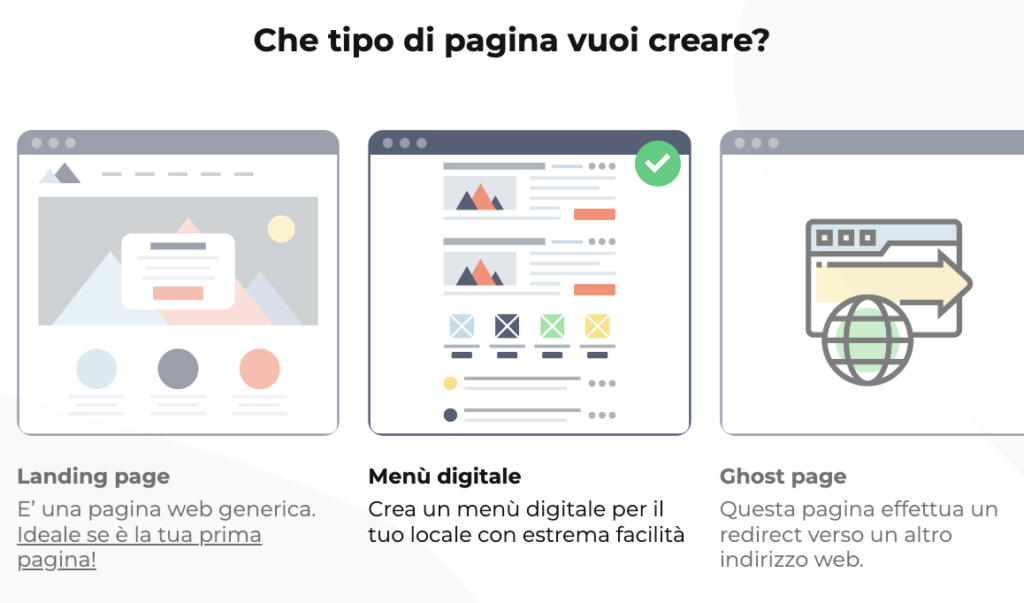
- Now you can choose the type of page you want to create and, obviously, select Digital Menu as in the figure and click “Next”
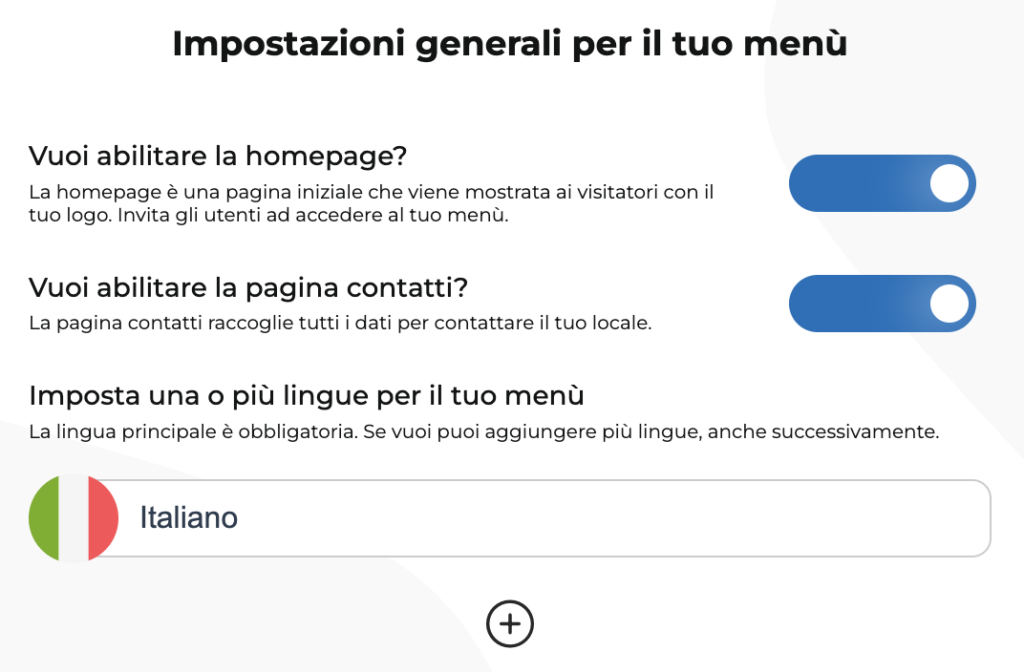
- You are now in the basic configuration of your menu. Enable the homepage and contact page and click on the + to add a default language. Select the Italian flag and write Italian in the field. In the end you should have a screen like this. Click on “Create your project”
- Great, you’re almost done. Now all you have to do is choose a graphic template. Select “Triana Menu”, then you can change it as many times as you want 😃
- At this point you can proceed with entering all the information about your restaurant and creating your new digital menu. In the next paragraph we have listed all the fields with their explanations.
Advanced configurations for your menu
In this paragraph we have reported all the configuration fields so you can understand how the information you enter will be used and which are mandatory or not.
- Upload your logo: This is a required field. You can click and upload a photo directly from your smartphone gallery or from a folder on your computer. The logo will be shown on the home page of your menu, as if it were a profile picture of a social network
- Upload a photo that represents your venue: this is also a mandatory field. You can upload or take a photo of your venue. The chosen image will be shown on the home page of your menu as if it were the image of a social network diary
- Briefly describe your venue: the field is optional. We recommend that you write a short presentation of your venue, the concept or any other information useful to understand what experience you will give your customers. This description will be visible on your venue’s home page
- Footnotes: The field is optional. Here you can enter any items you want to appear at the bottom of your menu categories page. For example, it is the field that is often used for cover charge or other generic information such as additions etc.
- Enter the address of your restaurant: the field is optional. Where required by the chosen template, the telephone number is shown
- Enter the name of your restaurant: this field is mandatory. The name you enter is shown on the home page of your menu
- Address of your business, postcode, city, province and Country: These fields are required. They are shown on the contact page of your menu. Based on the template chosen
- Do you have a WhatsApp contact number? The field is optional. If required by the template, a button is shown to send a message to the number entered. It includes two fields, the first is the number, the second the text you want users to see on the button
- Connect your social channels: the field is optional. You can click on the + and add one or more social channels. For each social channel you must enter the link. They are shown where required by the template.
- Add an external link: The field is optional. You can click on the + and add one or more buttons. For now, if you are not familiar with it, you can skip this part.
- Menu access button: by default set to “Browse the Menu”. You can write anything and what you write will be shown on the menu access button on the main page.
- Contact page button: Default set to “Contacts”. As with point 11, what you write will be shown on the button to access your restaurant’s contacts from the main page of your menu.
- Do you want to manage other product information? Enable if you want to manage features for your products. By default you will find the most used ones: Spicy, Organic, Vegetarian, Vegan. With the + button you can upload any image and create endless features.
- Do you want to manage allergens? Enable if you want to manage allergens for your products. We have already loaded all allergens according to current European legislation.
- Customize the colors and fonts of the template: in this section you can choose the colors and fonts to personalize and make your menu unique.
Create categories and upload products
At this point, if you have carefully followed our entire guide, you are on this page:
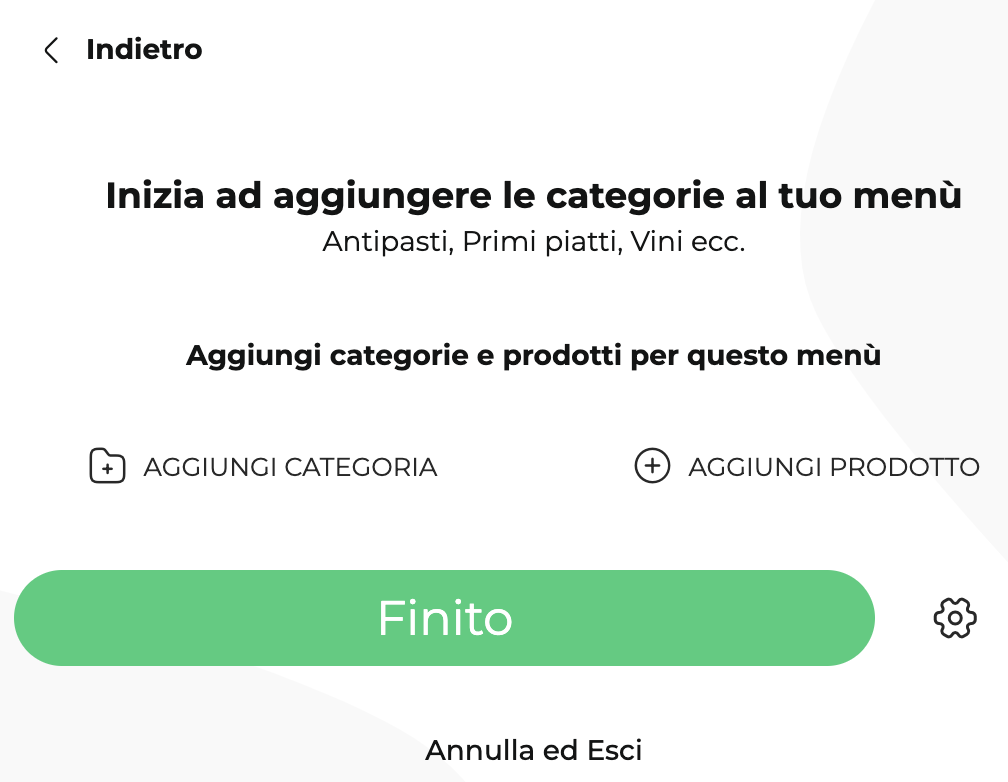
Well. It’s time to start uploading the categories and products of your menu.
Start adding a category with the ADD CATEGORY button. Clicking will open the categories page as in the photo:
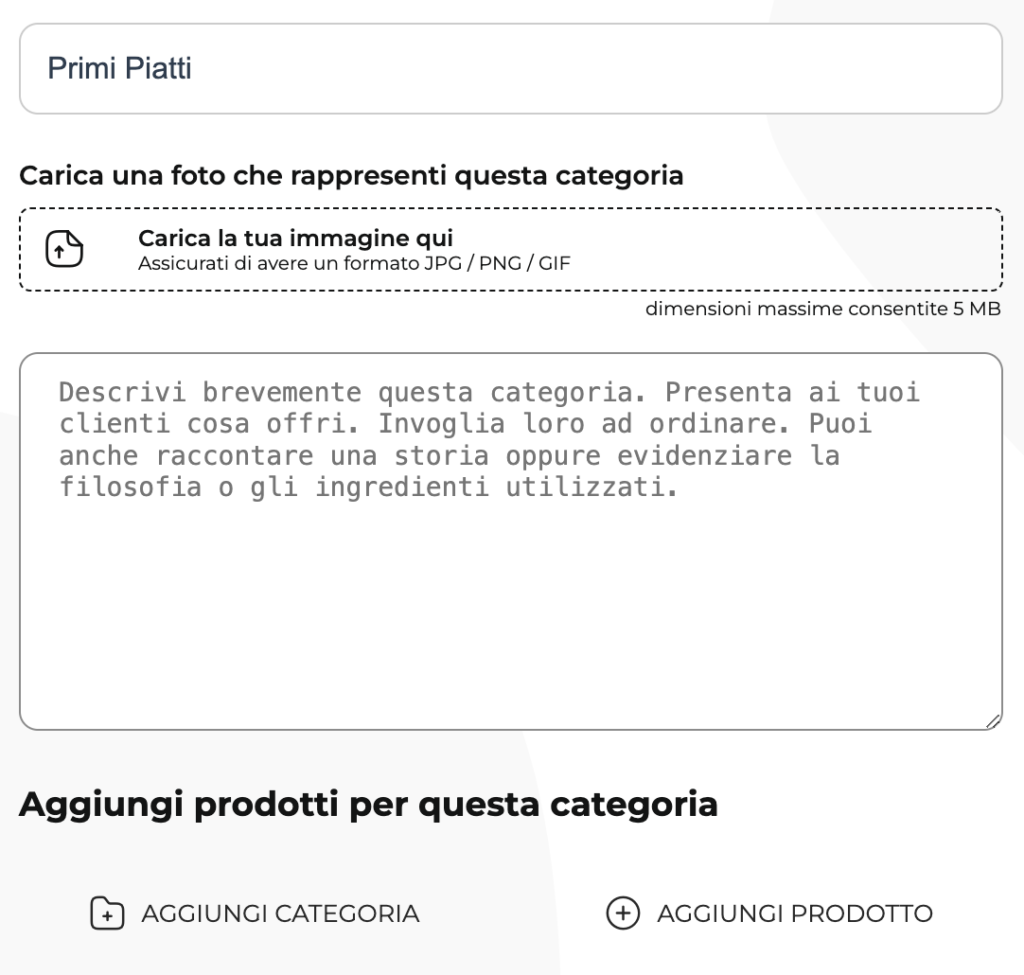
In the first field enter a category name. In our example “First Courses”. If you prefer you can add a photo and a description which will be shown based on the template. We’ll leave them blank for now, you can come back to them later. At the bottom you can continue to create a subcategory with the ADD CATEGORY button or start uploading your dishes with the ADD PRODUCT button. We click on ADD PRODUCT to open the loading screen for a product.
On the products page you can add the product name in the “Product Title” field, upload a photo, add a product description, list the ingredients, add a price and an addendum.
What is an appendix? It is simply a small text that will appear after the price. For example, you can enter the value “€10” in the price (you can also enter the euro symbol if you like) and in the appendix write “/minimum 2 people”. At this point the price will appear like this on your menu: €10 / minimum 2 people. You can use the appendix to enter any value: each, 5 pieces, on request, etc.
Finally, if you have enabled the management of Allergens and Characteristics on the configuration page, you can manage them after the price and appendix fields.
You can also enable and disable allergens for each individual product. All you need to do is select the features for the specific product.
Daily management of the menu
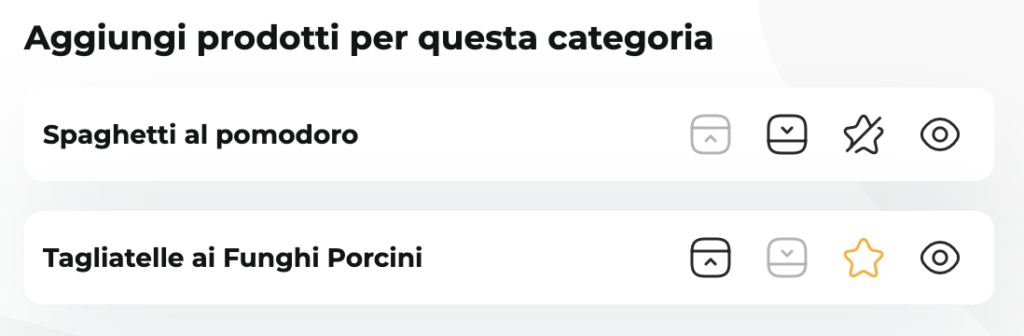
If you have followed our entire guide you will find yourself with a page similar to the one in the photo. We have added two categories: First Courses and Second Courses.
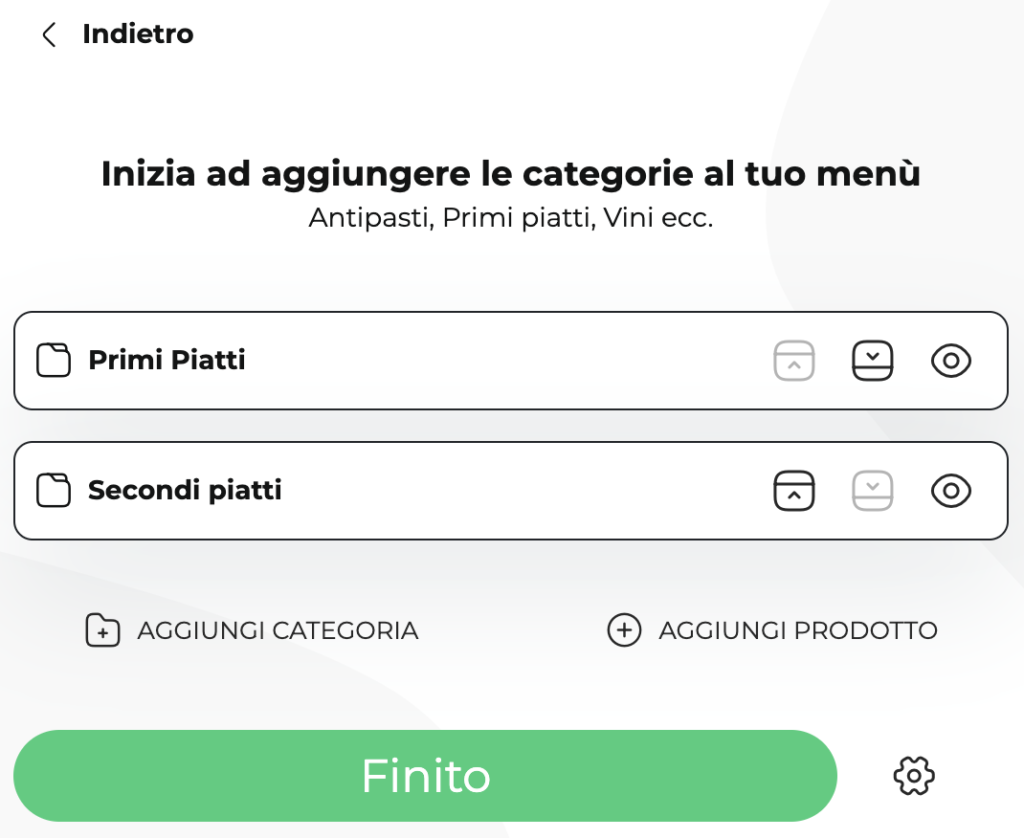
As you can see, you can recognize the categories by the folder icon next to the category name. On the right of the name you have 3 options: the eye icon which hides or shows a category from the menu. For example, you may want to hide the entire First Courses category for a period of time or because you have menu changes between lunch and dinner. The change will happen in real time! The icons with the up and down arrows instead allow you to change the ordering of your categories or products.
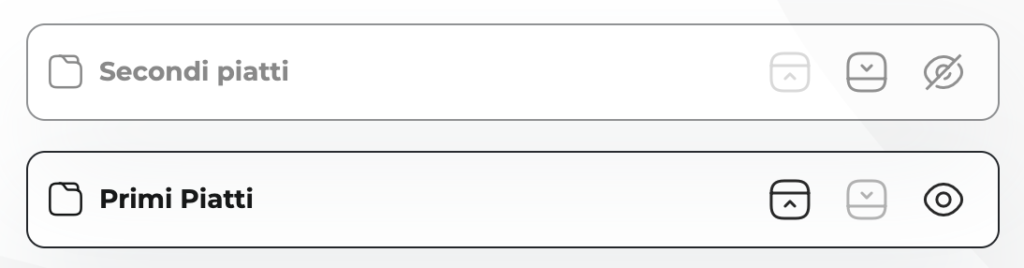
In the example below we had fun hiding Second Courses and changing the ordering of the categories:
Within the First Courses category, we have included two products. Each product has the same features just seen such as hide/view and sorting. Plus it has a small star-shaped icon that allows you to highlight one or more dishes. The effect changes from template to template, all you have to do is try 😃
Once the work is finished, all you have to do is save everything and click on FINISHED. Your menu will already be visible throughout the web and accessible at the link you have chosen. When you exit the menu builder you will find yourself on a page like this:
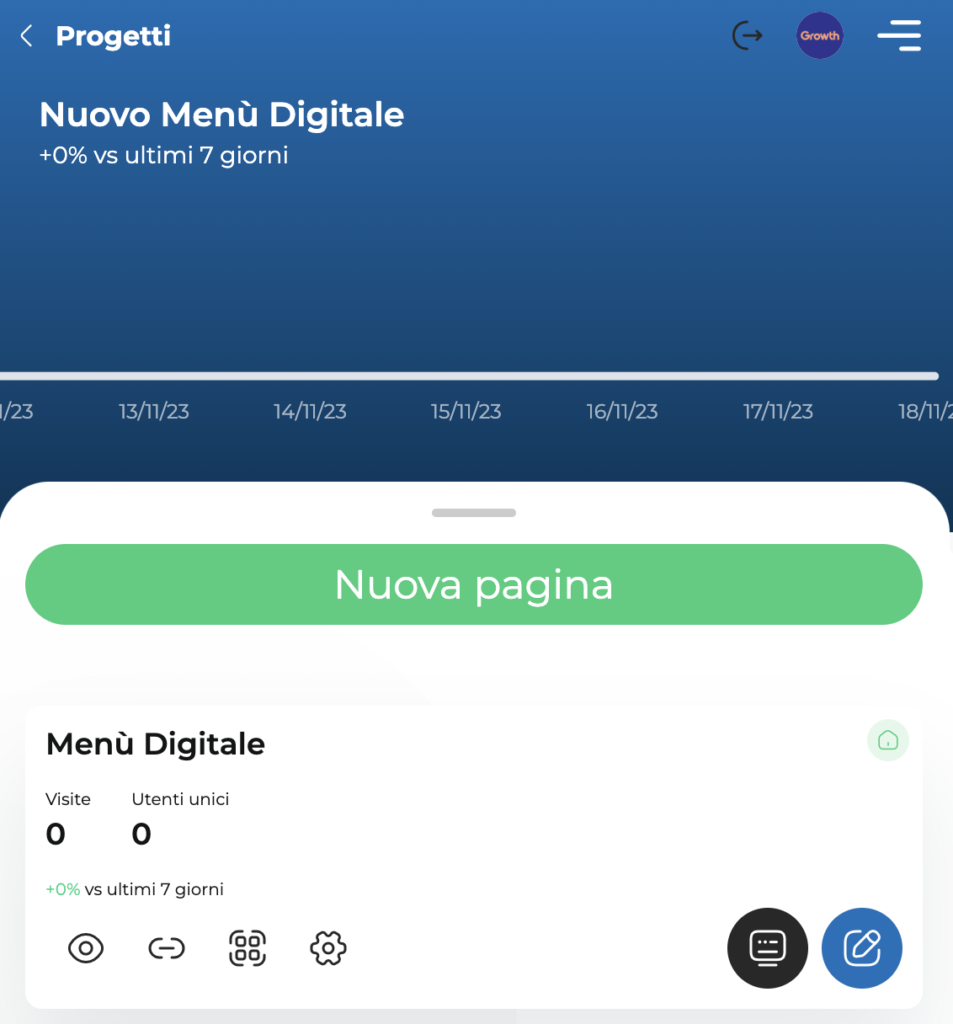
In your digital menu tab you have several options. Let’s see them together:
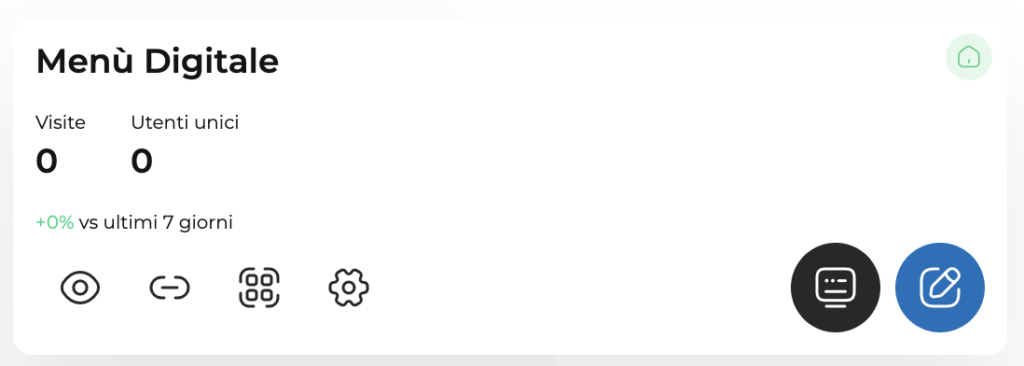
Starting from left to right:
- the eye icon will show you the preview of your new digital menu
- immediately next to it is the chain icon which will copy the link to your menu. Try clicking and pasting it on WhatsApp to send it to a friend of yours 😉
- the third icon generates the QR Code of your menu. You can forward the downloaded file to your graphic designer to print the QR Codes to place on the table in your restaurant
- the gear icon enters the menu settings. Here you can also enable other languages for your digital menu 🇮🇹🇬🇧🇪🇸
- On the right there are two buttons. The blue one is used to access the menu builder to add categories and dishes, make changes or hide or show dishes as needed. The dark button instead allows you to change the graphic template of the menu.
Conclusions
At this point you should have understood the dynamics of creating a menu. The most substantial work is that of the initial configurations which, once done the first time, you will hardly need to modify them.
We assure you that it is much easier to get your hands dirty than trying to follow a long explanation like this. This article was written with the intent of guiding you to discover a solution that allows you to have full control over your digital menu.
We recommend that you start by familiarizing yourself with the system. We are sure that it will become of daily use as it has been and still is for hundreds of Ho.Re.Ca entrepreneurs. who chose us.
You become free to add, delete, modify, hide products at will and in real time.
Remember, we are always at your disposal also with the onboarding service which you can request directly here. One of our operators will guide you step by step through the construction of your new digital menu. Together it will be child’s play 🙌🏻